 + 1-888-827-0150
 + 44-20-3006-2750


Lesson 9: Adding Videos to Your Slide
In this lesson, we’ll be looking at how to add videos to your slide.
Objectives:
- To demonstrate how to add videos to PowerPoint presentations
- To point out how doing this can help enhance your slideshows
In the previous lesson, we were able to point out that the main reason we add images to our PowerPoint presentations is to enhance our content. We were able to point out the different ways in which we can add pictures to our slides and edit them. Much in the same way, adding videos to our PowerPoint presentations can help our slideshows become more dynamic. More importantly, there might be some data which is only available in video form—like if, for instance you’re presenting something about man’s first flight to the moon. We can save time by embedding these videos in the presentation so we won’t have to exit the slideshow to play the video.
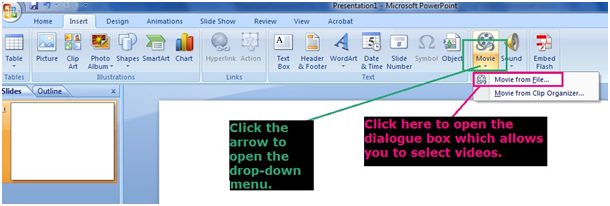
We can do this by selecting the Movie button which is located on the Insert menu. Clicking the arrow presents the drop-down menu of video options. From this menu, click Movie from File. This opens a dialogue box from which you can select the video which you want to add to your slide.
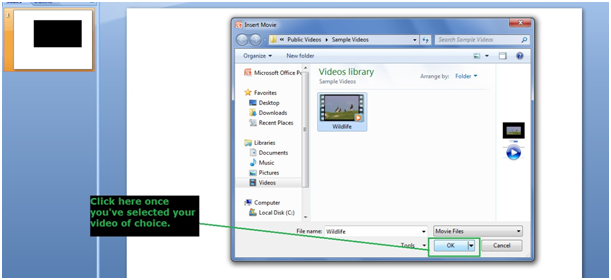
Once the dialogue box is open, select the video you want to insert and press “OK” so that it appears on your slide.
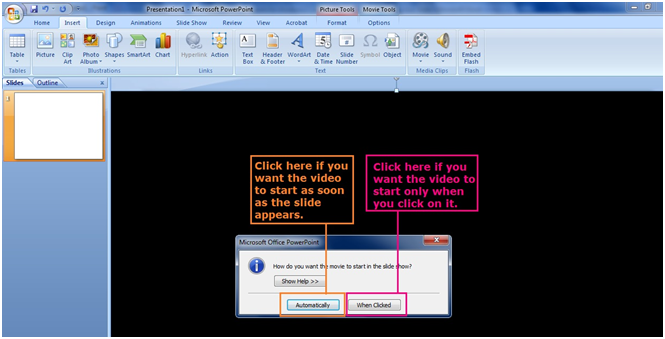
Your video will initially occupy the entire slide. A small pop-out box will ask you if you want your movie to start automatically, once your slide appears or if you want the video to be played only once you click on it. Choose the option which you think will best apply to your presentation.
You can adjust the dimensions by selecting it and click-and-dragging the corners or edges (again denoted by square and circle markers as with the images and the textboxes). Unlike images and textboxes, though you can’t tilt or rotate a video. A Movie Toolbar will also appear. You can use this to edit certain things about your video like the volume of the sound or the alignment (if you plan to put more than one object on the slide)
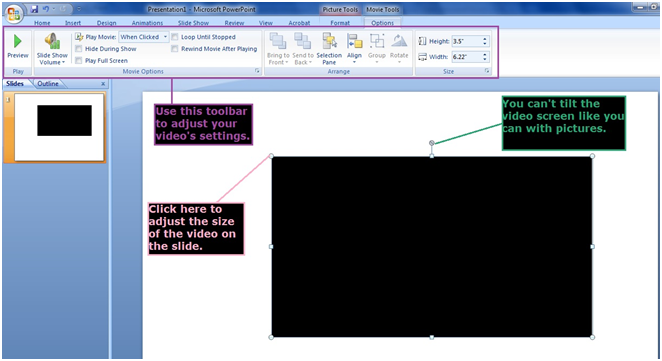
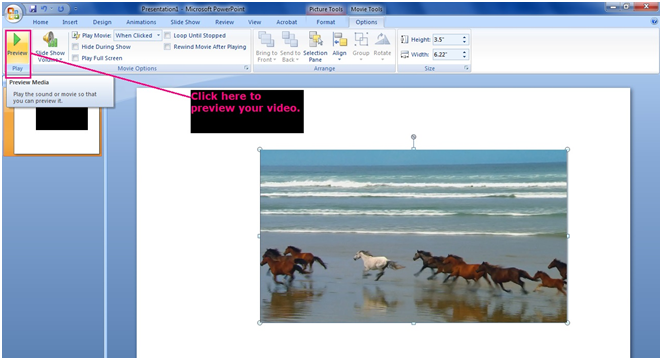
You will also notice that the left-most button on the Movie Toolbar says Preview. You can click this to see your movie play before you save your changes. This helps you ensure that the movie is good quality and that your file isn’t broken.
Once you’ve made sure that your video works and you’ve finished making changes, you can now save your file. You can also preview the full slideshow by pressing F5 which (as we learned in previous lessons) activates the Slideshow view.
Try Our Exercise And and Prep Yourself for the Real Thing
In this lesson, we were able to learn how to insert videos into our presentations. We took a look at the process of making our presentations more informative by adding movie clips. We learned how to adjust dimensions and to arrange our videos so that our slideshows are more dynamic, informative and entertaining.
Next we’ll be learning how to add custom animation to our presentations. This helps the movement of our slideshows become more fluid. It also helps our audience pay more attention.

