 + 1-888-827-0150
 + 44-20-3006-2750


Lesson 8: Designing Your Slide
In this lesson, we’ll be looking at the different ways you can manipulate design elements in PowerPoint.
Objectives:
- To identify the different tools for design in PowerPoint
- To demonstrate how these tools are used
- To enumerate how these tools can enhance your presentations
Quick Navigation through the Lesson 8:
In this previous lesson, we learned how to create slides. In this lesson, we’re going to learn how to design them. While it is essential to learn how to create a slide in order to make PowerPoint presentation, what will give your slideshow that extra push is how well its designed—are the flow of ideas clear? Does the background look good? Do the images compliment the text? Here we’ll discuss the different design tools you can tinker with and how you can use them to your advantage.
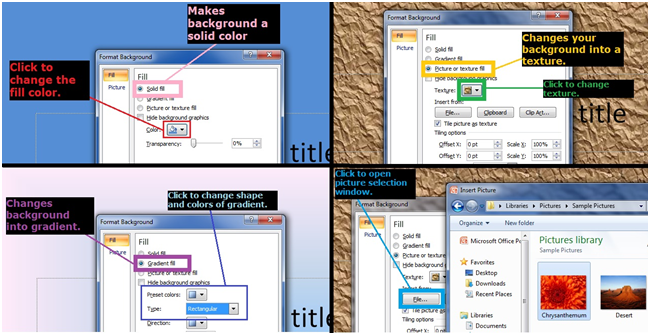
Background
The background is the most understated but important element of design in your slide—it provides the backdrop for all your text and designs. It’s usually good for the background of a PowerPoint presentation to be simple but eye-catching. There are four main options for your background—you can choose a plain color, a gradient, texture (provided by the software) or a picture which you’ve saved on your computer.
You can do this by right-clicking your slide and choosing the “Format Background” option. This opens the format window which allows you to pick which option you would like.
Text
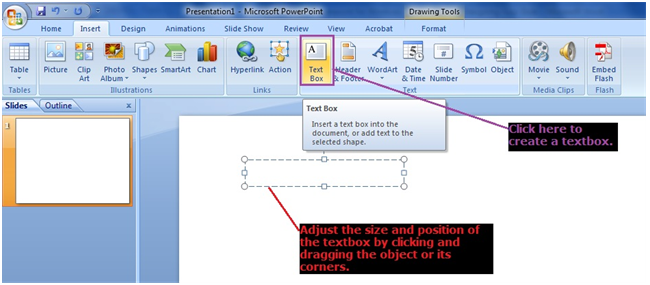
In a PowerPoint presentation, it’s important that your text is readable. It’s good to choose a reasonably sized font that is in print (if you decide to use a script font make sure it is big and clear enough to read. Unlike in Microsoft Word or other word processing programs, in PowerPoint text is added only by adding a textbox. This is found in the Insert menu, under the Text section. Clicking and dragging the textbox allows you to change its position. By clicking and dragging its corners and edges (represented by circles and squares) you can enlarge it or make it smaller to accommodate your needs. You can also select the round, green button at the top to rotate the textbox to whichever angle you’d like.
You can click and type into the textbox to input the words you’d like to add to your presentation. You can change the font, size and color by selecting the text and using the Home menu. Here you can also add effects to your text like making the letters appear in boldface, italics or as underlined text.

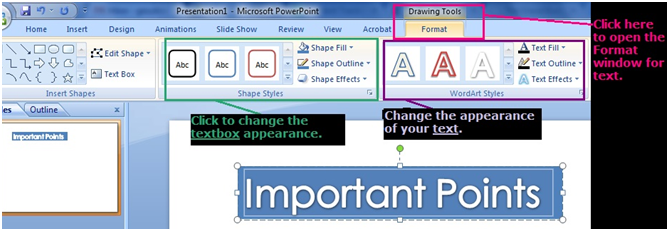
Another way to edit your text box is to click the Drawing Tools Format bar. This opens up more options not just for your text but for your textbox as well.
Here, you can change the fill and style of your text and textbox to suit your needs and preferences—PowerPoint also has some stock styles that you can choose from; these are most commonly used for office proposals and presentations.
Images
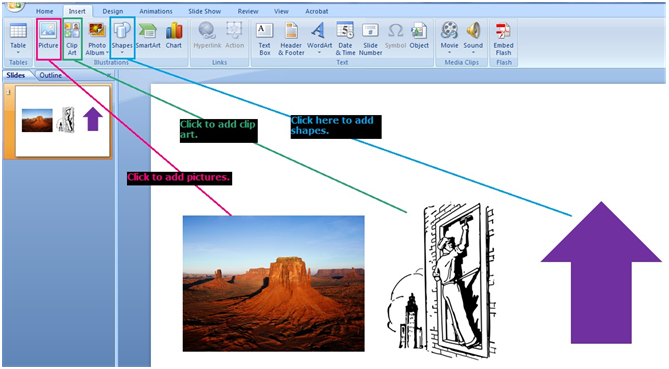
There are three kinds of images which we can add to a PowerPoint presentation—these images are used to enhance our slideshows. The three types of images we use in PowerPoint presentations include Clip Art (stock images which come with the software), shapes (basic autoshapes like squares, circles, arrows and stars) and pictures (images which you’ve saved in our computer). You can do this by selecting the Insert menu. From there, you can select which option you would like for your slideshow.
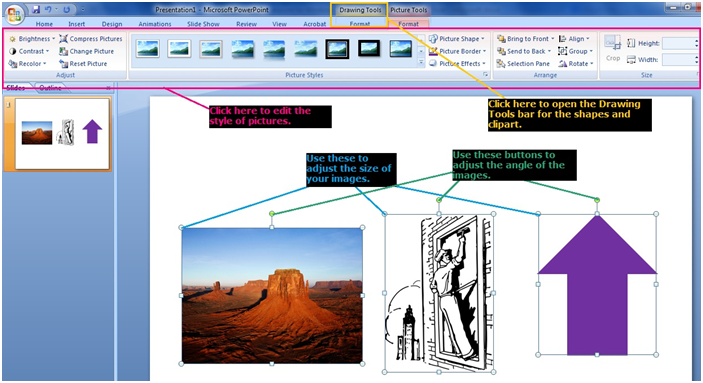
You can also choose the size of your images by selecting the image and dragging at the corners (as with the textbox which we described previously). Clicking the Drawing Tools bar (which we discussed previously) opens up the fill, color and style options for the images clipart and shapes while clicking the Picture Tools bar (which is like the Drawing Tools bar for the pictures) opens up these same options for the pictures.
In this lesson, we learned about the basic tools of PowerPoint design. We were able to learn how to insert text and images as well as how we can edit and rearrange them on the page. Knowing how to do these things adds to our abilities to come up with good presentations. Knowing how to tinker with colors, fonts, and the sizes and shapes of images makes our presentations eye-catching and helps us hold the attention of our audience. We were also able to point how to access these tools and features.
Try Our Exercise And and Prep Yourself for the Real Thing
Next, we’ll be talking about how to insert videos into our presentations and edit them. We’ll talk about what steps we need to take to make sure that the videos we add to our presentations will work when it’s time for us to run our slideshows. As always, we’ll also be pointing out how to navigate the software to get to the button which allows us to insert videos. Keep reading—we’re this close to mastering making PowerPoint presentations!

