 + 1-888-827-0150
 + 44-20-3006-2750


Lesson 6: Views
In this lesson, we’ll be looking at the different modes of viewing your PowerPoint presentation.
Objectives:
- To identify the different views available in PowerPoint
- To demonstrate how these views are used/accessed
- To enumerate reasons why these views are relevant to PowerPoint users
Quick Navigation through the Lesson 3:
In this lesson, we’re going to be discussing the different kinds of views which are available to PowerPoint users. We’ll be talking about the three main views which we can use to look at our presentation. Each of these views are important because they allow us to see different aspects of our slideshow: we’re able to look at the top-view of our presentations (seeing them as a whole) as well as the view with guides (which are optimum for editing)—and finally, we’re able to see them in action (which is perfect for previewing the presentation itself).
The View panel is different from the View menu which we took up previously. The latter shows us different aspects of the editing page—like the Master page, for instance—whereas the former literally shows us different points of view when it comes to our presentation. This panel is located at the very bottom of the page. The types of views and how to access them are outlined below.
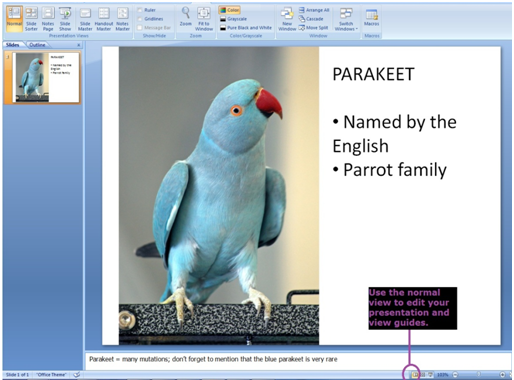
Normal View
The Normal View is the editing view: it splits the screen into three—the presentation page, the Slides & Outline panel and the Notes panel. This is how your presentation looks when you first open your PowerPoint window. Normal View is PowerPoint’s default view meaning it will always revert to this view upon opening or closing the presentation file.
This allows you to change things about your presentation and allows you fully immerse yourself in the details—you can see all the guides and all your notes. You can edit using the toolbars and different features. This view is normally used in the process of creating the PowerPoint presentation. Should you be in a different viewing mode, you can access this by clicking the first button on the View panel.
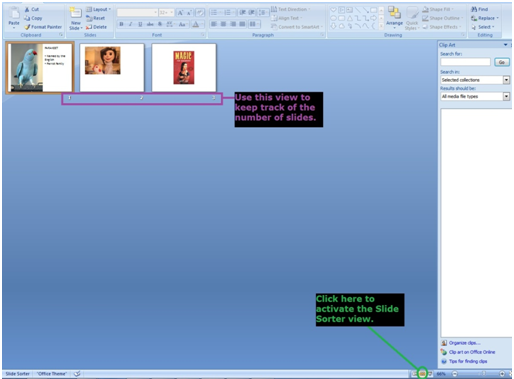
Slide Sorter View
The Slide Sorter View is usually used toward the end of creating a PowerPoint presentation when one is double-checking the slides. This view shows you thumbnails or tiny versions of your presentation. This allows you keep track of the number of slides in your presentation. It also allows you to trim your presentations by removing unwanted slides—this can be done very easily by clicking on the particular slide and pressing the Delete button on your keyboard. You can access this by clicking the second button on the View panel.
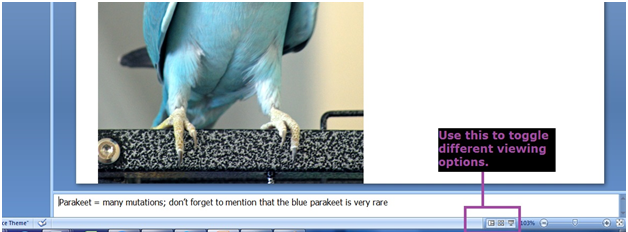
Slideshow View
The Slideshow View is used to preview how your slideshow will look. In this view all guides, panels and toolbars disappear. Instead all you see is the presentation. This view is ideal especially for test-runs (and of course, the actual presentation). You can active this view by clicking on the third and last button on the View panel or by pressing F5 on your keyboard. When this view activates, nothing but the slide will appear on the screen—don’t panic. You can navigate the slides by using your arrow buttons. You can also exit this view by using your mouse to click on the screen or by pressing the Esc button on your keyboard. Once you exit this mode, you will return to the Normal View.

In this lesson, we were able to discuss and look at the different views which we can use to edit and test our PowerPoint presentations. We were also able to discuss the different ways in which we can use this to our advantage when creating good slideshows.
Try Our Exercise And and Prep Yourself for the Real Thing
Our next lesson is going to focus on how to create a slide. Here, we begin to make our own slides. We’ll be taking a step-by-step look into how we can use to PowerPoint to make good presentations. We’ll begin with the technical basics: next up we’ll be learning how to create, delete and duplicate slides.

