 + 1-888-827-0150
 + 44-20-3006-2750


Lesson 12: Printing Your Presentation
In this lesson, we’ll be learning how to print our presentations.
Objectives:
- To demonstrate how to print our PowerPoint presentations
- To enumerate the different uses of printing out our presentations.
Printing your PowerPoint presentation can serve many different purposes—you might want to print out a general outline of the topic you’re working on or you might want to print a detailed copy of your presentation to be able to prepare for a meeting. Because of this, PowerPoint comes equipped with many different layouts in which you can print your presentation. You might opt to print one slide per page or you might want to print eight slides per page, as thumbnails. In this lesson we’re going to be learning about how to print our documents.
Before printing, it’s important to preview our work—here we can check the alignments of different objects and we can see if everything which appears on screen will appear on the paper. We can access the Print Preview screen by clicking the Office Button, hovering our mouse over Print and selecting Print Preview from the drop-down menu.
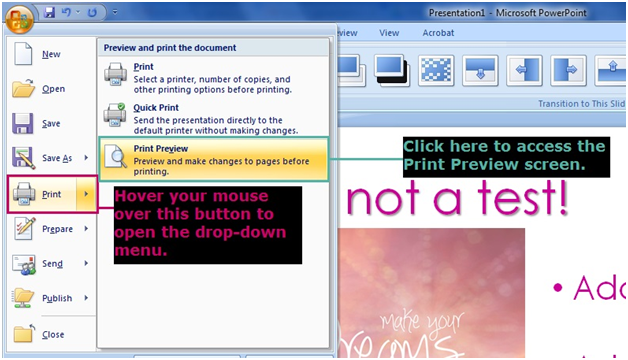
Once we’ve checked everything, we Exit the Print Preview screen (by simply clicking the Exit button) and proceed to Print our presentation. To do this, we go back to the Office Button, hover our mouse over the Print button again and this time, select Print. Do not select Quick Print—this will print your document without allowing you to change its settings.
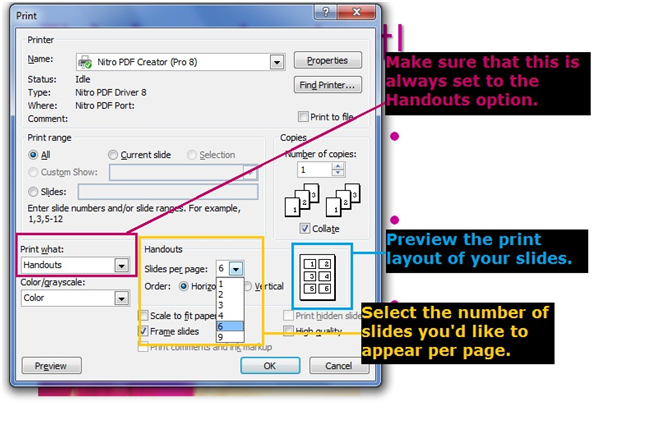
After you select Print, a dialogue box will appear. On the lower-left hand part of the dialogue box you’ll see a portion which says Print What: in this section, you should click the bar to reveal a drop-down menu. Select Handouts. Once you do this, you’ll notice that the part to the right which is labeled Handouts will activate. Here, you can select how many slides per page you would like to print. A small preview will show up below the menu,
showing you how the slides will look once they’re rendered on the paper.
Now we’ve successfully gone through all the things that you need to know to use Microsoft PowerPoint (the Windows 7-compatible version) effectively. In this lesson in particular, we were able to learn how to properly print our slides. We learned how to access the Print Preview screen as well as how to select which layout we’d like for our slides.
Next we’re going to be back-tracking and taking a look at everything we learned in this class—we’re going to be summarizing everything that we took up in this class. Keep reading and take the final step to mastering Microsoft PowerPoint!

