 + 1-888-827-0150
 + 44-20-3006-2750


Lesson 10: Adding Custom Animation
In this lesson, we’ll be learning how to add custom animation to our presentations.
Objectives:
- To demonstrate how to animate the objects in our PowerPoint presentations
- To demonstrate how to set the timing for the objects in our PowerPoint presentations
- To enumerate reasons why these views are relevant to PowerPoint users
Quick Navigation through the Lesson 3:
Custom Animation is probably PowerPoint’s biggest advantage. Among other things it’s this feature that sets apart a presentation or slideshow made with PowerPoint from other manual ways of presenting (say using a whiteboard or cardboard visual aids)—it allows the objects on the page to move in a manner that adds an element of fun to the presentation. Also, the unique thing about custom animation is that it can add a specific timing to your slideshow. For example, if you decide to set your presentation to music, you can make it so that objects appear at a certain point in the song or that objects disappear to a certain rhythm.
In this lesson, we’ll be outlining the different types of custom animation that you can use for your presentations. We’ll be showing you how to access them on the PowerPoint interface. In addition to this, we’ll be enumerating a couple of different reasons why you might want to use these particular kinds of animation for your presentations.
Custom Animation
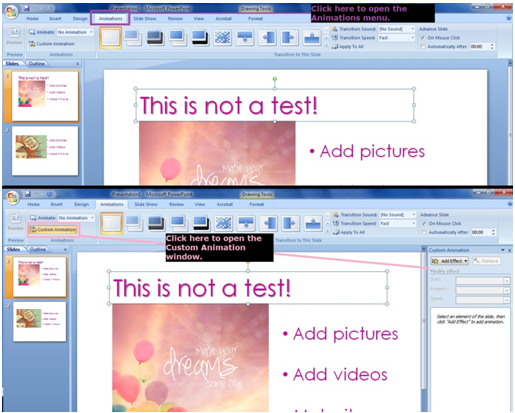
While custom animation is a broad term which refers to the movements within your presentation, it also particularly pertains to the movements of elements within a slide. You can access this and the other options we’ll be discussing in this lesson by clicking the Animation menu.
In particular, you can click the Custom Animation button on the left-hand side of the screen. This will reveal the Custom Animation menu which allows you to pick from a number of effects.
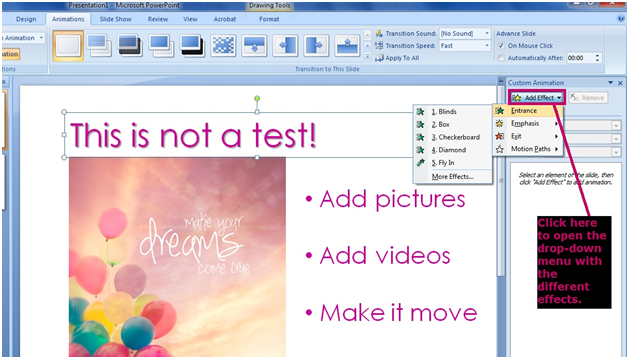
To preview the effects you simply have to select the item you want to animate and preview the effect which you want by clicking the “Add Effect” button in the Custom Animation window. This reveals a drop down menu with different kinds of animations that you can choose from.
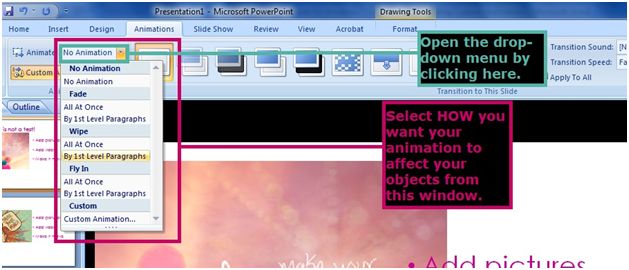
You can also choose how the effects are carried out by clicking on the Animate: option on the upper-left. This drops down to show you the different options which you have when animating your words and pictures (e.g. “All at once”).
Transitions
Transitions between slides are very important. They can make or break your presentation—if you’re able to provide a transition which is easy on the eyes and which entertains your audience then your slideshow will be effective. If the transitions you use are jarring or boring, then you may risk losing your audience’s attention. The transitions options can be located in the middle of the Animation menu. To apply a transition, you should first select the slide you want to transition from in the Slides panel. Next, hover your mouse over the different options in the Animations menu to preview how it’ll look once applied to your slides. When you’ve decided click the type of animation you want to apply it to the selected slide.
![]()
Timing
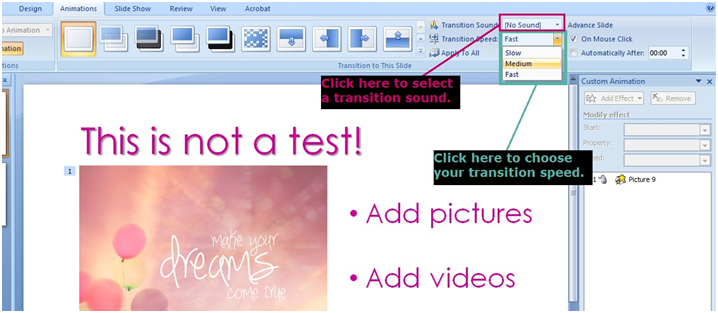
Another interesting thing about PowerPoint’s different types of animation is that you can change the transition speed as well as customize the timing of the slideshow—you can automate it so that the slides transition after a fixed period of time.
To change the transition speed, click the Transition Speed: option—this will reveal a drop-down menu which allows you to choose between the speeds Slow, Medium and Fast. You also have the option of choosing a transition sound to add another element to your slideshow. This can be accessed by the Transition Sound button located above Transition Speed.
In this lesson, we were able to tackle the different ways in which we can animate our presentations. We learned how to implement Custom Animation, how to add animated transitions between slides and how to add transition sounds to our slideshows.
Try Our Exercise And and Prep Yourself for the Real Thing
Now that we’ve learned how to animate our slides, we go to our next lesson: we’re going to talk about how to save our PowerPoint presentations. We’ll be tackling the different ways and different formats in which we can save our work and the different advantages that each of these options has to offer. We’ll also be demonstrating how to save your presentations in each of the available formats.

