 + 1-888-827-0150
 + 44-20-3006-2750


Lesson 2: Proofreader’s Marks
Objectives:
- To provide a short introduction to proofreading
- To enumerate the different marks used when proofreading
- To define all the marks used and enumerate their purposes
Quick Navigation through the Lesson 2:
- Delete/Omit
- Close-up
- Delete and close-up
- Insert here
- Separate/insert space here
- set too far right/set too far left
- Write in all-caps
- Write in lowercase
- Set in italics/set in roman type/set in boldface
- Was this intended?
Proofreading is the process of reading, evaluating and marking a paper for technical errors—these include grammar, punctuation, sentence construction and paragraph organization. In this lesson we’ll be looking at the different marks which proofreaders use as a standard. Writing these marks down on paper can help both yourself as the proofreader and the writer of the paper you’re correcting: this helps you both save time and make quicker corrections to the paper than if you were using long sentences to convey your point. Below, we’ll be discussing each of the marks, their purposes and how they’re used.
1. ![]()
Meaning: Delete/Omit
These marks are used to denote that you need the writer to omit the word, sentence or paragraph which you’re referring to. Writing this over a word or paragraph saves you the trouble of writing the comment onto the margins—it also helps you avoid confusion over which parts need to be omitted.
An example is provided: ![]()
2. ![]()
Meaning: Close-up
This mark is used when a word is split into two or when there is an unintentional or inappropriately placed space in the work (e.g. when you are asking the writer to merge to paragraphs or two sentences).
Example of a Close-up:
![]()
3. ![]()
Meaning: Delete and close-up
This is a hybrid of our first two marks—this features either of the “omit” symbols, within the “close-up” symbol. This is used when there is a misspelled word and an inappropriate space within the work. This allows you to hit two birds with one stone, making both the commenting and editing procedure easier.
An example can be seen below:
![]()
4. ![]()
Meaning: Insert here
This symbol which is reminiscent of an arrow allows you to indicate where to insert a piece of data. This makes it less confusing both for yourself and the writer of the work. This also allows you to be clear with your instructions, something that all writers who work with you will appreciate.
Below is a small demonstration of how this is used when proofreading:
![]()
5. ![]()
Meaning: Separate/insert space here
This is the opposite of our second symbol. This indicates that two words, phrases, sentences and/or paragraphs should be separated from one another. This is placed between the two bodies of text that need to be separated.
6. ![]()
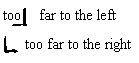
Meaning: set too far right/set too far left
This is used to indicate errors in alignment and spacing. These help you point out errors which might be too long to indicate in the margins (e.g. “Please align this properly—it is set too far left.”); it also helps you proofread thoroughly so as to alert the writer of errors not just in content but in the format as well.
Below are examples of how both of these marks are used:
7. ![]()
Meaning: Write in all-caps
This mark indicates that a word or certain letters should be spelled out in capital letters. This again, saves you the time and effort of having to spell out your comments.
Below is an example of how this is used; the example also features how the work should be corrected:
![]()
8. ![]()
Meaning: Write in lowercase
This mark indicates the opposite of our previous points—that the word, letters, sentences or paragraphs should be set in lowercase letters.
Below is an example, along with the corresponding correct answer:
![]()
9. 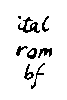
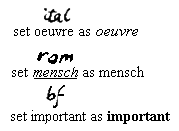
Meaning: Set in italics/set in roman type/set in boldface
These three marks are used to indicate errors in type—they help indicate what the writer should do for certain words or phrases that have either been failed to be highlighted or which have been misguidedly highlighted.
Below are examples of all three:
10. ![]()
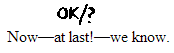
Meaning: Was this intended?
This is used when dealing with texts that are highly stylistic (e.g. stream of consciousness in fiction)—you can use them to ask the writer whether or not a certain thing that was technically wrong needs to be corrected. This can be written over the word which needs clarification.
Below is an example of how this symbol can be used:
[WpProQuiz 212]
In this lesson, we were able to discuss the different marks that are commonly used to indicate corrections and comments throughout a body of text. We were also able to define proofreading, so as to provide a short introduction to what proofreading is and what it entails.
Try Our Exercise And and Prep Yourself for the Real Thing
Our next lesson will be exploring this further. We’ll be looking at the job description of a proofreader and the different responsibilities which it entails. In addition to this, we’ll also be discussing the scope and limitations of a proofreader’s job.

