 + 1-888-827-0150
 + 44-20-3006-2750


Lesson 3: The PowerPoint Window Menus
In this lesson, we’ll be looking at the different PowerPoint menus.
Objectives:
- To identify the different PowerPoint menus
- To discuss the different menus and their corresponding functions
Quick Navigation through the Lesson 3:
One of the most important things when learning how to use new software is being familiar with its layout—you need to know where to go to access certain features and how to perform certain actions. In the next few lessons, we’re going to be familiarizing ourselves with the PowerPoint window and its different parts. We will also be the different actions and functions of the various toolbars, menus and buttons available on PowerPoint for Windows 7. In particular, this lesson will focus on PowerPoint’s various menus.
The menus make up the main PowerPoint toolbar and are found on the upper half of the page. They provide your main control panel and allow you to alter the way that your slides look. Learning how to use this portion is key when making a PowerPoint presentation because this is how you’ll know where to go to achieve something in your work—whether it be indenting the text a certain way or changing the orientation of your slide. In this part of the lesson, we’ll take a step-by-step look at the PowerPoint menus.
Home
Home is the first menu and is the left-most tab on the PowerPoint panel. It contains the main options that you can employ throughout your PowerPoint presentation. For every section of each menu, there is an access button which you can click to expand the particular section. The different uses of each section are outlined below.
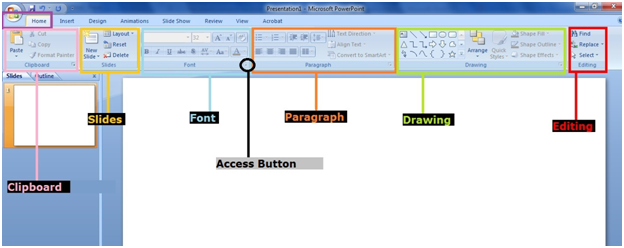
i. Clipboard
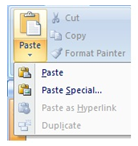 The clipboard helps you keep track of the things which you’ve copy/pasted onto your document. You can use this to paste text or images quickly. Clicking “paste” also gives you certain options such as Paste Special which provides you the option of pasting a special kind of picture format or pasting a link.
ii. Slides
The slides section of the Home menu helps you format your slide—here you can choose to create a new slide, delete an old one and/or change the way text is formatted on the current slide.
iii. Font
This helps you edit your text format—you can choose the typeface, color and size of your text as well as apply special edits like the options of boldface, italics or underlined text. Also, unique to more recent Microsoft Office formats are the strikeout option and the shading option which allows characters to look as if they are embossed by adding a shadow.
iv. Paragraph
This allows you to tinker with the layout. Here, you’ll find the tab buttons which deal with fixing indentations, the alignment buttons which allow you to choose whether to align left, right, center or to justify your paragraphs. You can also expand this section to be able to alter the spacing between your letters (e.g. single space, double space, etc.).
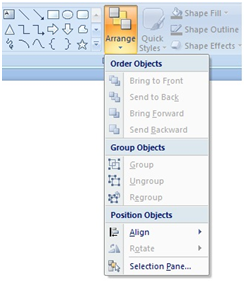
v. Drawing
The drawing section gives you the option of inserting basic shapes onto the slide and editing them. It also allows you to group objects onto a page and likewise, ungroup certain objects which have been previously bound together.
vi. Editing
This allows you pick out certain text from the entire presentation and alter it quickly. You also have the option of quickly replacing certain errors which you might have made throughout the body of the slideshow.
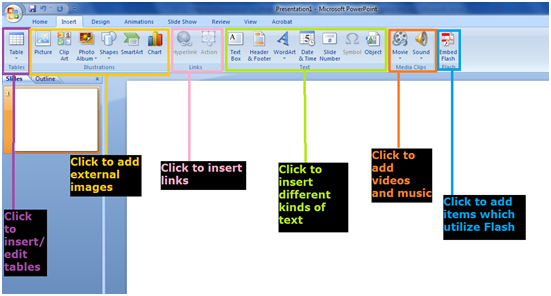
Insert
Insert is the second menu on your control bar and primarily deals with importing outside material in order to enhance your slideshow.
This part of the insert bar helps you create or import tables for when your presentation deals with certain numerical data. You can choose the number of rows and columns of your table and subsequently, tailor-fit them to your tabulation needs. You can also import tables straight from Microsoft Excel if you need to. You can also do this for Word Art (text rendered as 3D images) and other media like pictures, video clips and/or music. You may also want to choose to import links or embed flash-animated objects within the presentation.
Design
The design menu is third on the control bar and deals with the standard layout and look of your PowerPoint presentation.
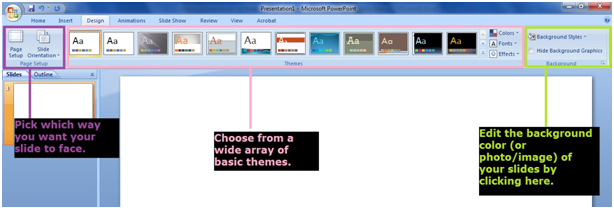
i. Themes
Later on in the tutorial, we’ll be looking at how we can save our own slides as templates. However, there are also stock themes provided by Microsoft which allows for quick, easy formatting of your presentation.
ii. Orientation
There are two kinds of orientations which your slides can have—portrait and landscape. This section of the design menu allows you to choose and experiment with the orientation so that you can pick which is best for you, according to your need.
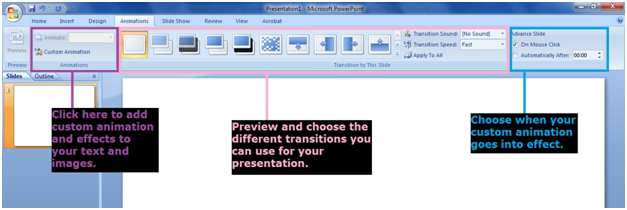
Animations
The animations menu is the most interactive of the PowerPoint menus because it allows you to customize the way that the information in your presentations appear—here, you can set the way the different objects on your page will behave. You can have them fly or dissolve on or off the screen—these are called transition animations. Furthermore, you can also add sounds and set a specific time for the elements to do this.
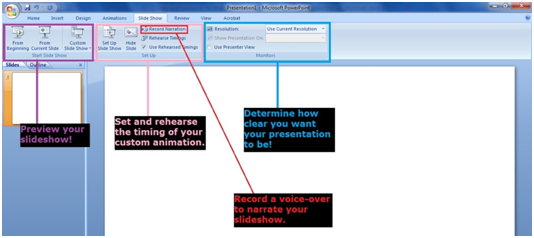
Slideshow
This menu allows you to preview the way your presentation will look without the guides of the editing portion of the software. Here, you can rehearse the timing of specific portions of your slideshow as well as edit its resolution. If you plan on having the presentation viewed in your absence, there is even the option of recording a voice-over narration.
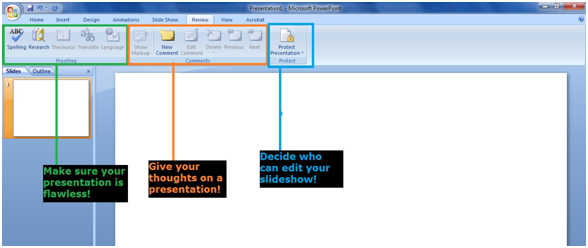
Review
The review menu is ideal for when you are collaborating with someone on a presentation. Here, you can insert comments on certain aspects of the slideshow. This menu also contains the proofreading materials such as Spelling & Grammar Check and Word Count.
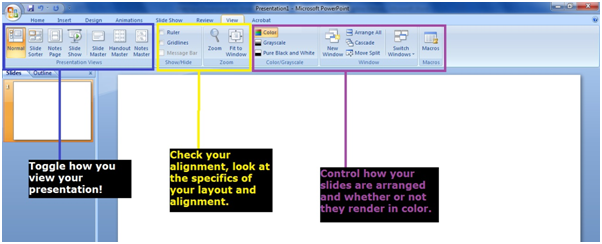
View
This menu allows you to look at your presentation in different ways—you can choose to view the slides in the handout format or as a slideshow. Here, you also have the option of editing the template and making changes to the master slides—for instance, adding page numbers—this applies the change to the entire document. We will be elaborating on this feature later on in the lesson.
Acrobat
This final menu allows you to export your presentation—you can save it as a stand-alone presentation which, like a movie file automatically plays or you can export it as a .pdf if you plan on using it as an e-book. You also have the option of altering the exporting preferences depending on your needs—you can, for example, make the program format it so that it’s ready to be embedded in an e-mail.
In this lesson, we learned about the eleven different menus present in Microsoft PowerPoint. We took a look at the different ways in which we can use these menus and how their different sections function. This helps us build a good foundation for our next lessons.
Try Our Exercise And and Prep Yourself for the Real Thing
Next up we’ll be talking about the different toolbars which allow us to edit our slides easily. We’ll be taking a look at the Office Button, the Quick Access toolbar and the two different Drawing Tools bars which help us edit specific objects like textboxes and images.

